In February, I participated in the Great Backyard Bird Count. The annual event is hosted jointly by The Cornell Lab of Ornithology, Audubon, and Birds Canada. Over a long weekend, citizen birdwatchers from around the world count birds from wherever they are. Two free apps are available for identifying and reporting observations – Merlin ID and eBird. A training webinar is offered in the weeks leading up to the event, and posted online. The GBBC results for the world are reported on their dashboard (use filters to hone in on specific locations). I’ve participated in this fun and important event for the last couple of years (see Counting Birds and Counting Birds for the GBBC).
Use the Merlin ID app to identify birds in your selected area
Use Merlin's Sound ID feature to identify birds by their songs or sounds
This year I submitted two lists on two separate days. Both were made during 15-minute periods, while walking in the neighborhood (up by the reservoir near the oak and redwood grove). This small woodsy area provides plenty of food for birds and trees for cover, with few people in the area to disturb our avian friends.
Use the eBird app to submit bird lists to the GBBC
Use eBird to see what other species have been observed nearby
I was surprised to see that many of the bird species that I heard and saw in the woodsy area, also frequent the Bird Buddy feeder in our yard. Examples include Oak Titmouse, Chestnut-backed Chickadee, American Robin, House Finch, Song Sparrow, California Towhee, Dark-eyed Junco, and California Scrub-jay. The numbers and varieties explain why our Bird Buddy feeder is depleted of bird seed so quickly (glad to know that the birds are not just relying on the bird feeder for sustenance)! The GBBC is a great way for citizen scientists to contribute data related to one of our favorite hobbies - watching birds in our backyards and in nature.
In late February I participated in the Great Backyard Bird Count (GBBC), hosted by The Cornell Lab of Ornithology, Audubon, and Birds Canada. Over a long weekend, citizen birdwatchers from around the world, both novice and expert, count birds from wherever they are. Two free apps are available for identifying and reporting observations - Merlin ID and eBird. The GBBC results for the world are reported on their dashboard (use filters to hone in on specific locations). I participated in the count last year and really enjoyed the experience (see Counting Birds).
A few faithful species visited the yard despite the yard renovation
I'm afraid my results were a little spotty this year because of the landscaping project. Despite the turmoil in the yard, hummingbirds continue to visit the hummingbird feeder throughout the day, and a family of mourning doves scratch for insects in the disrupted dirt every morning and evening. Likewise, the little wren stops by for a quick snack of insects. The new yard design is wildlife friendly, so should be worth all the disruption!
In late February I joined the annual Great Backyard Bird Count (GBBC), hosted by The Cornell Lab of Ornithology, Audubon, and Birds Canada. Over a long weekend, citizen birdwatchers count the birds they see and hear from wherever they are (not just the backyard), and send in the count. Birders of all abilities are encouraged to participate, from novices to experts. This was originally a United States-based activity, but it has grown to include birders from around the world.
The Merlin Bird ID app helps you identify birds (use the key to the right to select a category)
To prepare for the big weekend, I attended a Webinar about how to participate. It was fun to learn how schools use the event as part of their science curriculum (sometimes with a little healthy competition between schools); families and clubs use it as an outing activity; and travelers use it as a way to explore a new area. The Webinar presenters were very helpful and informative, and the Chat was filled with tips and tricks, links to more tools, questions from newbies, and wisdom from the experienced.
I used Merlin to distinguish between a crow and a raven
Two free apps were recommended for the event: Merlin Bird ID helps you discover which birds you see or hear, and eBird Mobile enables you to submit your observations. You can download lists of birds from Merlin for your area or around the globe, and use them to identify the birds you see. Alternative ways to participate are available, such as accessing lists and tools through a laptop computer, and reporting your results by telephone or mail. Lack of a smart phone is not a barrier!
I used the eBird app to submit my observations (couldn't find a way to delete the crow, after deciding I had seen a raven, but found a way later)
The Great Backyard Bird Count weekend was a lot of fun. I participated from the comfort of our backyard here in the East Bay, in view of the water dishes and the hummingbird feeder; and in San Ramon, during a walk around Bishop Lake. The tools are so useful. I especially like the Sound ID feature in Merlin (it helped me distinguish and identify some of the bird calls from the shrubs that surround the yard). You can see the results of the 2023 GBBC survey, and filter by regions or the world (they are still crunching the numbers, so the final results will be available in early April).
The Merlin Sound ID tool helped me distinguish several bird calls from the shrubs
I'm looking forward to participating in the GBBC event next year, and hope you'll join me from the comfort of your own backyard!
Autumn has arrived here in the San Francisco Bay Area, and this is the perfect time of year for bread making, which ties in with our "homesteading in the city" theme. All this year we have been making and doing for ourselves, with all the comforts of modern life. This time we’re making fluffy dinner rolls, using a stand mixer that is equipped with a bread hook. I haven’t done much bread making, so this is a chance to develop a new homesteading skill, and prepare for the holidays ahead.
Fluffy dinner rolls brushed with melted butter
My inspiration is my Aunt Char who is a master of the fluffy dinner roll. When she has hosted Thanksgiving or Christmas dinner, she typically has a huge Tupperware bowl filled with living, breathing bread dough. She effortlessly pulls off chunks of dough, rolls them into balls, lets them rise in her warm kitchen, and then pops them into the oven. They are served piping hot, with butter and jam. The jam is often procured by my mom from the bakeries and gourmet kitchen shops that she has visited, as she and my dad travel up and down the west coast. Together, the rolls and jam are absolutely delicious!
I decided to use the “Best Homemade Dinner Rolls Ever!” recipe by Rachel Farnsworth, from the “Stay at Home Chef” blog. I recommend watching Rachel's video several times before starting, and reading her recommendations. She has developed this recipe over a five-year period, so draws upon a lot of experience!
Ready for butter and jam
Mix and Rise Phase
Combine ingredients.
Incorporate flour.
Let rise.
Combine ingredients with a stand mixer equipped with a dough hook
Form, Rise, and Bake Phase
Form rolls, and let rise.
Bake rolls.
Remove from oven.
Form dough
Let dough rise, and then bake
Serve and Enjoy
Finally, it’s time to enjoy these fluffy dinner rolls! I’m serving them with butter and delicious raspberry preserves from Los Rios Ranch.
Fluffy dinner rolls and artisan jam
Freeze for the Future
I tried freezing six of the rolls in a plastic container for later. About an hour before dinner, I took several of them out of the freezer, and then wrapped them in a moistened dish towel and warmed them in the microwave right before we sat down to eat. The rolls were delicious and a real treat for a midweek meal. I haven’t tried freezing the dough for later use, so that will be a future experiment.
Freeze some rolls to pull out for midweek dinners
In closing, this a wonderful recipe and very successful, even for a newbie. My only complaint with making dinner rolls is that they take planning and time, and need to be coordinated to have them available to eat with the meal. With experience, this would become easier to do, and well worth the time to learn the skill. Bring on the holidays!
Summer has officially arrived! Here in the San Francisco Bay Area, our weather vacillates between our usual temperate climate and times of blazing hot heat! As part of our "homesteading in the city" theme this year, we're making summer treats to enjoy during those heat spells, using our modern gadgets. First, we’ll make lemonade in the Instant Pot, and then blueberry sorbet in the ice cream maker.
Refreshing summer treats
Lemonade is one of the quintessential drinks of summer. It is tart, sweet, cold, and refreshing. As a youth, my family traveled from rainy Alaska to sunny Southern California every two years to visit our extended family. During long, hot afternoons, Grandma Char served tall glasses of ice-cold lemonade, poured from her glass pitcher.
I’m using the Instant Pot Lemonade recipe from the “Make Me Some Sugar” blog, by Kelsey. The recipe produces two cups of concentrate, and is ready to mix now (or freeze for later).
Ingredients for making lemonade concentrate
Ready to mix up a batch of lemonade
Sorbet is delicious and refreshing any time the temperature heats up. This time we're making blueberry sorbet, using fresh blueberries and the Blueberry Sorbet recipe from the Ultimate Ice Cream Book, by Bruce Weinstein. I've been working my way through its collection of recipes for years, and have never been disappointed. First make a simple syrup, then combine the syrup, blueberries, and lime juice in a blender. Freeze the mixture in an ice cream machine. It could not be easier.
Ingredients for blueberry sorbet
Ready to eat, or transfer to the freezer
Find a shady spot in the yard and serve your summer treats. Enjoy!
Grandma Char's pitcher still serves up ice cold lemonade
In this video I’m sharing more updates to my studio, with the spotlight on new fabric and fibers. In another video we reviewed new products and equipment (see Studio Updates: New Gear). It’s always fun to try new ideas and new techniques. I may not use everything this year, but I like to be “tooled up” and ready.
Mercerized Cotton Fabric
One acquisition is two yards of bleached, 100% mercerized cotton print cloth (CPC) from Dharma Trading Company. The fabric is used by quilters, sewers, beginning dyers, and fabric painters. Mercerization is a process applied to plant fibers to increase luster. It is applied to fabric after weaving, or to yarns and threads after spinning. Mercerized fibers absorb more water, and therefore more dye, making the color of the dyed cloth brighter and deeper (sometimes by as much as 25%). The process gives cloth better color resistance over multiple washings, increased strength, smoothness, resistance to mildew, and reduced lint.
Another acquisition is one yard of bleached, 100% linen fabric, also from Dharma Trading. Linen is durable, breathes, and is good for dyeing. It maintains density during use, and does not lose color.
These small 100% linen napkins are carried by Amazon. They are described as being soft, with a heavyweight feel, 6" x 6", with elegant ladder hem-stitching and mitered corners. I’ve never dyed with linen, so am interested to see how well it absorbs color.
These silk satin scarves are also a departure since I’ve never dyed protein-based fiber. They are 8" x 54", though many other shapes and sizes are available from Dharma Trading Company. The hems are hand rolled with 100% silk thread, and the scarves are ready to dye and paint. I plan to use the silk for eco-dying – the direct transfer of color from plant to fiber, with the right mordant.
This Peruvian Highland 100% wool yarn is also a departure into protein-based fiber. The sturdy, all-purpose yarn is distributed by Amazon. I’m not a knitter, but the description says the yarn is used for cable stitch patterns, intricate winter sweaters, textured stitches, and everyday accessories. It also felts beautifully. I purposefully purchased this lovely Mink Heather color, to try overdyeing. Overdyeing is the process of dyeing previously dyed fiber, with the intent to further change the color. I have 100 yards.
These cotton dish towels are an old favorite and always in my arsenal of fabric. We’ve been dyeing them since the beginning, and they remain a standard.
Cotton Dish Towels Photo Credit: Target (Made by Design)
Leftovers from Last Year
We also have some leftovers from last year, including large and small cotton handkerchiefs, and cotton dinner napkins. Some have never been dyed. Others have been dyed, and I plan to overdye them.
Recycle Dyeing
Finally, I’ve been combing thrift shops and my own wardrobe for items to dye. Old T-shirts perk up nicely in the dye bath, and fabric from various sources may wind up in a quilting project. Very sustainable!
Reuse and repurpose old fabric
Well, that is it for now. As you can see, I have lots of plans, but may run out of time. Whatever I decide to do, I’m tooled up with various fabric and fiber types and ready to dye!
In this video I’m sharing some updates to my studio, with the spotlight on new products and equipment. In another video we’ll showcase fabrics. It’s always fun to try different ideas and methods. I may not use everything this year, but I like to be “tooled up” and ready.
Digital Scale
One new acquisition is a digital kitchen scale, used to weigh fabric and material for dye projects. This replaces my trusty kitchen scale that is limited to one pound. This affordable Beurer scale weighs up to 33 pounds (15 kilograms), and informs you if an item is “over limit”. You can configure different units, including pounds and ounces, ounces, grams, and kilograms. And you can retain a measurement, which is ideal when trying to weigh materials and record the results at the same time.
Digital kitchen scale for weighing fabric and dye material
Convection Cooktop
Another acquisition is an electric convection burner. I resisted going this route because convection cooktops require flat-bottomed, magnetic pans, which are more expensive and harder to find at thrift stores. But I was eager to move away from propane canisters, which require special disposal. This affordable Ovente Induction Cooktop offers a range of preset temperature levels, from 140 to 465 degrees Fahrenheit. Five timer levels are preset from 1 minute to 3 hours. Safety features shut down the burner when not in use. My camp stove worked well, but it was difficult to regulate temperature (it was either on or off). Luckily one of my thrifted stainless-steel pans works with the new cooktop.
Convection burner
Low-suds Detergent
I ran out of Synthrapol scouring soap at the end of last season, so this year I’m trying a low suds Professional Textile Detergent distributed by Dharma Trading Company. Here in the West, we must conserve water, so I’m hoping a low-suds detergent will reduce the quantity of water needed for rinsing.
Jars, Cans and Containers
I’m always on the lookout for good jars, cans, and containers. Last year I purchased a 3-liter canning jar at a thrift store, which works great for solar dyeing. Jars are also handy for storing used dye, collecting plant material, and mixing additives. Cans are also useful for mixing and extracting dye. Meat and vegetable trays can be used to collect and dry plant material. They are often high quality and in a variety of sizes.
Cans, jars, and containers are great for storing, drying and preparing dye material
Ferrous Sulfate
Last year I added ferrous sulfate powder to a red camelia dye bath. Iron darkens or “saddens” the dye bath, producing darker colors. This year I’d like to experiment more with using iron in the dye bath as a modifier to produce additional colors. You can make your own iron mordant solution by soaking iron in vinegar water and use it as an alternative to ferrous sulfate.
Make your own iron solution
Exhaust Dyeing
This year I also plan to experiment with exhaust dyeing, which means reusing dyes. Over the last several years I’ve collected quite a few left-over dyes. They have been used once, which is the first exhaust. Each use of a dye is an exhaust. With each exhaust, the color becomes lighter and lighter. Modifiers, such as washing soda and iron, change the pH of the dye bath and further modify the dye color. I’m curious to see the range of colors that can be produced from a single dye bath.
Each reuse of a dye is an exhaust
Solar and Eco-Dyeing
This year we’ll try more solar dyeing, which uses the sun or time to dye. And we may try "eco-dyeing", which is the direct transfer of color from plants. I’ve seen some interesting projects online.
Well, that’s it for now. As you can see, I have lots of plans, but may run out of time. Whatever I decide to do, I’m tooled up and ready to dye!
Our theme this year is "homesteading in the city", where we celebrate making and doing for ourselves, with
all the comforts of modern life! Today I'm making yogurt in the Instant Pot.
Homesteading in the city, with the Instant Pot
I make a batch of yogurt about once a month. It makes a great breakfast as a parfait with honey or jam, fruit, nuts and granola, or as a smoothie with frozen fruit and greens. Yogurt is a terrific base for dips and sauces, and can be used as a marinade for meat and seafood. You can strain yogurt to make curds, which can be used as a spread for bagels. The whey is an excellent liquid substitute for cooking and baking, and a refreshing drink.
Yogurt is fermented milk that has been heated and mixed with live bacteria. According to Wikipedia, the origins of yogurt are unknown, but it may have been invented in Mesopotamia around 5000 BC. Yogurt is used as a food source, and the probiotic bacteria is good for maintaining a healthy gut. When stored in a chilled environment, yogurt keeps much longer that milk, so is a good technique for preservation. Yogurt is typically made from cow's milk, but goat and other milk types can be used, including non-dairy soy and coconut milk.
To make yogurt, heat the milk to about 180 degrees, and then cool it to about 115 degrees. This prevents the milk proteins from forming curds. Add the bacterial culture, and then ferment the milk between 86-115 degrees for 8 hours. Keep the yogurt in the refrigerator. Optionally, strain the yogurt through cheesecloth and a sieve to produce a thicker yogurt consistency or curds. Keep the whey, which is full of protein. Serve and enjoy!
Not sure how to get started with California Natives? You're not alone - including me, who has been fascinated with California native plants for years. I'm sold on the concept of using California native plants in the garden, but pulling it all together is daunting. The California Native Plant Society (CPNS) is kicking off a campaign to help. Bloom! California focuses on eleven starter plant groups, with recommendations for plants that are easy to grow in California, require low water, and are host plants for butterflies, birds, bees, and other wildlife.
The eleven basic plant groups include ornamental grasses, mints, iris, currants, clarkia, manzanita, yarrow, sage, phacelia, toyon, and oaks. Most plant groups included multiple plants suggestions. All can be grown in California, but some may be more suited to where you live. The filtered plant list has access to the Calscape database for information about each plant, its requirements, and the wildlife it supports. If you've signed up for Calscape, you can save plants to a custom list. I created "Bloom-CA" for my top favorites (and added a Western Redbud).
My top favorite native plants
Export to Excel for a convenient list of plant choices
This scoped list makes it easier to focus on several foundational plants to start, and makes a convenient shopping list. Calscape also provides information about nurseries where you can purchase California native plants. Calscape is a great resource for California gardeners (see Calscape from last year).
Soil compaction results when soil particles are squeezed together, eliminating air space. This makes it harder for water and air to infiltrate the soil, and for roots to grow and take up water and minerals. While researching methods of restoring compacted soil in Soil Restoration Under the Oak, I came across an arborist tool called an air spade (also known as an air knife).
The air spade is powered by an air compressor, and moves soil away from tree roots at super-sonic speed without damaging the roots. The video shows several tree care applications, including vertical mulching around marker 0:54, and soil aeration around marker 2:25. Note that this is not a product promotion, just a very informative video. You can find more examples by searching the Internet using a variation of "air knife for arborists".
In our case, our arborist did not recommend something as powerful as an air spade, since the compacted soil under the oak tree is not in a foot traffic area. The wood chips are sufficient to start.
Learn more:
Keeping Native California Oaks Healthy, by Bruce W. Hagen, Forest Pest Specialist, Forest Pest Management Program. California Department of Forestry and Fire Protection, Tree Notes, Number 7, June 1990.
In his Bring Back the Natives keynote, Dr. Douglas Tallamy spoke on what we can do to attract and sustain nature in our yards. Dr. Tallamy mentioned two tools for figuring out what to plant – Calscape and Native Plant Finder. Last month we took a look at the Calscape tool. This month we'll take a look at Native Plant Finder tool.
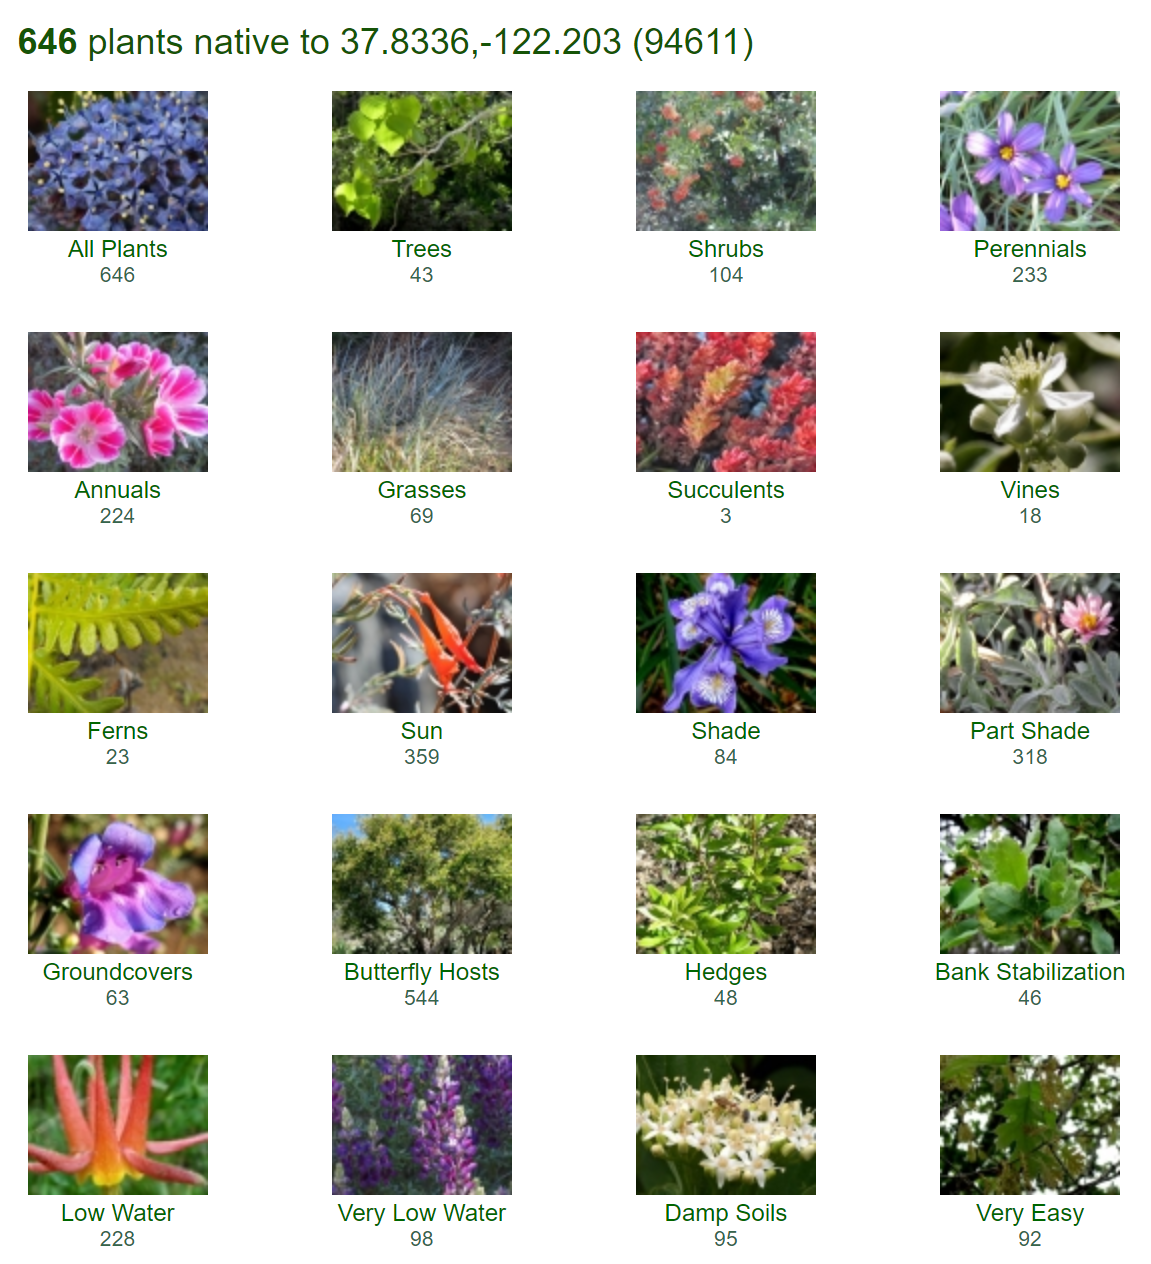
The Native Plant Finder website (in Beta) is designed to help you find the best plant species to attract butterflies, birds, and wildlife in your area. The data is sourced from the U. S. Forest Service, The National Wildlife Federation, and the University of Delaware, where Dr. Tallamy is a professor of entomology and wildlife ecology. Enter your zip code, and search for plants or butterflies that are native to your area.
Native Plant Finder in a browser – enter a zip code to get started
Native plants filtered by category for the zip code entered
For example, I can check the Trees and Shrubs section for hawthorns, to learn more about the hedge of hawthorn bushes in our yard. I find out that the native species in our area is Cratageus suksdorfii, and that 78 species of butterflies and moths use this bush as a caterpillar host plant. That probably explains the early morning chorus of birds in the lower yard!
The native hawthorn is a great caterpillar host plant
Save the plant and any of it attracted species to the list, for later research.
My native plant and butterfly list
Select Suppliers > Native Plant Directory, to access a list of native plant suppliers by state. For California, I see several favorite nurseries here in the San Francisco Bay Area, including Bay Natives, Berkeley Horticultural Nursery, and The Watershed Nursery. If you use the mobile app, you have easy access to your lists and sources while out shopping for plants.
I highly recommend Native Plant Finder as a resource for anyone who gardens here in California, or in North America. You can use the tool without an account for general research or add a free account to use features like lists. I especially like the emphasis on hosts plants, no doubt thanks to Dr. Tallamy's entomological background. Not only can you learn which native plants would thrive in your garden, but which are the best host plants for attracting the birds, amphibians, and wildlife you'd like to see in your yard!
In this episode of Plants to Dye For - Season 2, we're using a combination of alum and soda ash to mordant our fabric. In previous episodes we scoured the fabric [see Scouring your Fabric (Soaking Method)] and mordanted the fabric using oak gallnut [see Mordanting Fabric (Oak Gallnut)]. You may wonder why we are re-mordanting our fabric. Dyers frequently mordant fabric multiple times to intensify the color or improve colorfastness. For example, after mordanting with an oak gall tannin, a dyer might mordant with an alum bath of 15% WOF, followed by a second fresh alum bath of 10% WOF.
I'm using alum and soda ash (also called washing soda), both of which I purchased online. Together the alum and soda ash act as brighteners. Alum (or Potassium Aluminum Sulfate) also prepares the fiber to bond with the dye. Soda ash (or Sodium Carbonate) changes the pH of the water, and can be added for dyes that respond to a higher pH level.
For equipment I'm using a large plastic bucket for presoaking, a stainless steel pot for soaking, and optionally I can use a candy thermometer to check water temperature. Maiwa recommends using hot water between 120-and-140 degrees Fahrenheit (or 48-and-60 degrees Celsius). For this technique, you do not need to “cook” the fiber. You can start with hot tap water, and let it cool naturally. It is not necessary to reheat the bath to maintain temperature. For safety, wear a face mask when measuring powders, so you don't inhale small particles.
Alum and soda ash for second mordant
According to Maiwa, the Weight of Fabric % for the brighteners is:
15% WOF for Alum
2% WOF for Soda Ash
We have just over a pound of fabric, or 448 grams, so we'll use:
1/4 cup of Alum (67.2 grams)
1 3/4 teaspoons Soda Ash (8.96 grams)
2-4 gallons of water (I used about 3 gallons)
First, soak the pre-washed and scoured fabric in a bucket of hot water for at least and hour (or overnight). This helps ensure that the fiber soaks up the alum brightener evenly.
Soak the scoured and mordanted fabric
After pre-soaking the scoured fabric:
Add the fabric to the stainless-steel pot.
Dissolve alum in hot water and add to the pot.
Dissolve washing soda in hot water and add to the pot.
Fill the pot with enough hot water to cover the fiber. (If you are curious, you can check the temperature with the thermometer).
Stir.
Let soak for 1-2 hours. You can cover the pot so that it stays warm.
At this point you can: (a) Rinse and re-mordant, for example, at 10% alum. (b) Rinse and dye. (c) Steep an additional 8-24 hours. (d) Air dry, to dye later.
I continued to steep the fabric overnight, stirring periodically.
Squeeze out excess liquid. Soda ash is caustic so wear rubber gloves.
Wash and rinse thoroughly in the washing machine, and hang to dry.
Air dry fabric
Now you can dye your fabric, or store it until you are ready to dye. According to one source, the alum can weaken the fiber, so it is best to use the fabric within a month to prevent this. For this video, we are labeling the fabric for storage, with plans to dye in a couple of weeks.
In his Bring Back the Natives keynote, Dr. Douglas Tallamy spoke on what we can do to attract and sustain nature in our yards. He invited us to think of our yards as being part of the food web, and collectively as part of a wildlife corridor for migrating or nesting birds. By planting hosts for the kind of food that birds, insects, amphibians, and animals need, we help ensure their survival. For example, here in the Bay Area, the oak tree is a key host in the food web. Dr. Tallamy mentioned two tools for figuring out what to plant –Calscape and Native Plant Finder (in Beta).
Calscape is especially good for those of us in California, and the San Francisco Bay Area where we have so many microclimates. The data is sourced from familiar plant databases, such as Jepson, CalFlora, California Native Plant Society, Wikipedia, and many more. You can enter your zip code or address to filter data specifically for where you live, for example 94611.
Calscape in a browser – enter a zip code or address to get started
Native plants filtered by category for the zip code entered
We have a live oak in our yard (Quercus agrifolia), and I'd like to learn more about what it contributes to the food web. Select Trees > Coast Live Oak to dive in.
Native trees for the zip code
From there, I can learn all about the oak tree in my yard. Including all the butterflies and moths it hosts, which provide a generous food source for birds and other creatures.
Butterflies and moths hosted by the oak tree
Another great feature is that you can create plant lists as you research. I started an inventory of native plants that I find in my yard. I still have work to do.
Plant Inventory of our yard in Detail view
I also started a list of native plants to introduce into the garden, and downloaded it in spreadsheet format. I can also access the information through Calscape running in a browser on my mobile phone. Calscape also links to native plant nurseries in the area, making it easy to find out what plants are available and where.
Plant Wish List in Grid view
Spreadsheet version for easy access
I highly recommend Calscape as a resource for those of us who garden here in the Bay Area, or anywhere in California. You can use it without an account for general research, but can add a free account to use some of the features like creating lists.