Home Page

Wednesday, September 30, 2020

Connections

One benefit of the COVID-19 pandemic and sheltering in place, is that I’ve rediscovered my own library, including some volumes that have languished on the shelves for decades. One of these unread volumes is Connections, by Jame Burke (Little, Brown and Company, Boston, 1978). Connections is the companion book to the popular PBS television series of the same name. My husband and I enjoyed the series in our youth, and I’ve always wanted to read the book. What better time!

Connections is about technological change, and looks at important innovations that were current in 1978 (and continue to be important in 2020 in their evolving state). The innovations include: the atomic bomb, the telephone, the computer, production line manufacturing, the aircraft, plastics, the guided rocket, and television. Burke looks at each of these as a family of similar devices, and explores each as closely connected events stretching from the ancient world to the present day. Every innovation acts as a trigger of further change.


For example, Burke asserts that the plow is the first man-made trigger that kicked off every other innovation to follow (increased productivity, united communities, administration of surplus food, storage systems, record keeping, mathematics, and so forth). The plow itself came about because of a change in weather. These changes each fostered additional changes.

Even though the book is over 40 years old, the ideas continue to be relevant and the history if fascinating. I especially appreciated Burkes challenge of traditional history, which typically focuses either on the genius “hero inventor”, such as Thomas Edison; a particular era, such as the Renaissance; or a theme, such as transportation. Instead he acknowledges the small innovations and discoveries that occur every day, by ordinary people, often in completely unrelated fields. When the time and need is right, these innovations are combined to push technology forward. I recommend Connections for anyone interested in the ideas of the past, which have brought us to where we are today, and are the springboard for the big ideas of the future.  


Wednesday, September 23, 2020

Dye Project: Logwood

In this episode of Plants to Dye for season 2, we're dyeing with logwood. The heartwood of the logwood tree (Haematoxylum campechianum) produces beautiful shades from red-purple to orchid-blues. Using mordants and additives, you can push the color to shades of brown, blue, navy, and even black. The logwood tree  grows in Mexico, Central and South America, Madagascar, and India, and has been a valued dye since the 16th century.


I purchased logwood chips online from Maiwa Textiles located in Vancouver, Canada. Maiwa recommends using 10-15% Weight of Fabric (WOF) for logwood. Unlike some dyes, logwood does well in hard water. If your water is soft, you can add calcium carbonate in the form of finely ground chalk, or an antacid tablet (such as Tums or Rolaids). Soda ash, ammonia, or wood ash water can also push up the pH. Logwood is colorfast, but is only moderately lightfast; you can add iron to the dyebath (rusty nails or similar) to improve lightfastness.

Logwood chips


The weight of fabric for this project is 308 grams (or about 10.8 ounces), for four white cotton dish towels. Fifteen percent WOF for 308 grams is 46.2 grams of logwood, or 1.6 ounces. Fabric should be scoured and mordanted. We used a gallnut mordant, followed by a brightener bath of 15% WOF alum and 2% WOF soda ash. See Scouring your Fabric (Soaking Method)Mordanting Fabric (Oak Gallnut), and Mordanting Fabric (Alum Brightener).


Outdoor studio with basic equipment


For this project you need basic dye equipment, and a well-ventilated workspace. You need a soaking pot, a dye pot, a heat source, and a candy thermometer to keep the dye bath at a consistent temperature. You need strainers, and a jar in which to store the dye bath. For safety, wear a face mask when working with fine powders, and rubber gloves when working with soda ash. Logwood comes with strong warnings that it can cause serious skin, eye, or respiratory irritation.

Extract the Dye

The basic process from Maiwa:
  1. Pour enough boiling water over the logwood to make a dye bath. 
  2. Soak overnight.  
  3. Pour off this liquid and use for the dye bath.
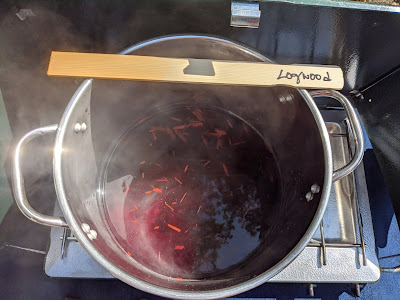
Boil about a gallon of water, enough for the dye bath. I'm using tap water for this project. Measure out the logwood chips, and add to the dye pan. Pour the boiling water over the logwood to make a dye bath. Color is released immediately. Optionally you can add calcium carbonate or other additives.  Our tap water is mildly acid (pH 6), so I’m adding one antacid tablet. Let the logwood chips soak overnight. 

Boil water

Pour boiling water over logwood chips and soak overnight


The next day, pour off this liquid and use for the first (and strongest) dye bath. Strain it through cheesecloth and a strainer to remove the pulp from the dye. The resulting liquor is deep red-purple. Keep the pulp. You can soak the logwood chips again and use the second extract for lighter shades. Repeat until no more color can be extracted. I’m freezing my pulp for later use.

Extracted logwood liquor

Strained logwood chips


Dye the Fabric

The basic process from Maiwa:
  1. Bring dye bath to a simmer.  
  2. Add wet fabric and simmer for an hour.  
  3. Allow to cool in dye bath. 
  4. Rinse and hang to dry.

Presoak prepared fabric before dyeing


Presoak your prepared fabric in a bucket to ensure the fibers absorb as much color as possible. This time I soaked the towels overnight in an alum and soda ash brightener bath, squeezed out the towels, and added them to the dye bath without rinsing.

Bring dye bath to a simmer (between 170-180º F)


Simmer fabric for an hour


Pour the strained logwood dye into the dye pan. I used about a gallon, which is plenty for four dishtowels. I can always add more water as needed. Bring dye bath to a simmer. Add wet fabric. Stir to loosen the fabric. Add additional water to cover if needed. Simmer fabric for an hour, keeping the temperature between 170-180º F (77-83º C).

Soak fabric for an hour or overnight


Continue to stir periodically for even dyeing, turning the fabric frequently while simmering. Turn off the heat and let the pan cool, leaving the dish towels in the dye bath. Maiwa gives contradictory information about the benefits of soaking logwood overnight in the dye bath (one citation recommends, another does not). Since I love saturated color, I decided to soak overnight as I usually do, and then decide for myself.

Squeeze out as much dye as possible


Squeeze out excess dye from the dish towels (but save the dye bath). Rinse the dish towels in cool water until the water runs clear. I used a combination of agitating the fabric in buckets of water, and rinsing under a stream of tap water. This can take a lot of time and water for these strong colors. Run the dish towels through the washing machine rinse and spin cycles without soap.

Rinse the towels until color runs clear


Rinse and spin cycles


Let the towels air dry. In a couple of weeks, run the towels through the washing machine using Synthrapol and an extra rinse. Include a piece of white cloth to test colorfastness. Air dry again.

Air dry the fabric

Keep the dye bath


Preserve the dye in glass jars to use in future projects. The dye color may be less intense, but it is still usable, either for a lighter shade or mixed with another color. Logwood can be used in combination with other dyes, such as osage, fustic, cochineal, cutch, and indigo. Adding iron can produce shades of gray or black.

Cotton dish towel dyed with logwood (purple)

Label and store dye for future projects


Learn More

  • Natural Dye Workshop: (Michel Garcia) DVD Set


Wednesday, September 16, 2020

"Fall" in the Bay Area

Fall in the San Francisco Bay Area is more like summer anywhere else. Temperatures vacillate between the mid-70s and mid-90s F. (and are typically 10 degrees higher over the pass in the Dublin, Pleasanton, and San Ramon Tri-valley area). It is our dry season, and we often have not had rain since March or April. The hills are golden brown. Wildfires often blaze or smolder somewhere in the state (part of the natural ecology). The air can smell like a campfire and the morning fog can be dense with an infusion of smoke.


My Example
Golden Hills

Red Sky at Morning

Roadside Apples

Bird Watching

Live Basil

Foliage Shadow Play

Mask-making Supplies

The Latest in Fall Masks

Fond Memories

Fall Favorite

For the Bay Area, these are the signs of fall. The days get shorter, temperatures cool off at night, and leaves turn red (or brown). The change of seasons is subtle, and takes awareness to notice! Even if it doesn't seem like fall, we can start cleaning up the garden for winter, and planning what to plant now to take advantage of the winter rains.

Wednesday, September 9, 2020

Enjoying the Birds

Bird watching is one of the many pleasures that comes from creating a wildlife-friendly yard. Local birds as well as migratory birds may be visitors. Many times our yard has hosted a flock of birds that descends on a particular tree and feeds voraciously on its blossoms, berries, or insects.


By choosing trees, shrubs and plants that contribute to the food web, you provide an attractive environment for our feathered friends. We learned more about this idea of host plants from Dr. Doug Tallamy in his online talk for the Bring Back the Natives virtual event (see Bring Back the Natives – Open and Native Plant Finder).


Succulent crickets provide nourishment

Moths and caterpillars provide protein

Add water and nearby shelter, and you provide even more resources for the well being of birds, and other wildlife. You benefit by attracting more birds all through the seasons.


A young Blue Jay enjoys a quick bath in July

A Yellow-bellied Sapsucker stops for a snack in January

Many years ago we installed sun shades on our pack patio (see Patio Shades). The shades can be raised and lowered as needed to block the bright sun and protect us from cool marine breezes. We've also discovered that the shades provide a sort of "duck blind" for observing birds. The birds are still aware of our presence, but seem to feel protected and secure enough for a quick bath and preening on nearby shrubs.

Observing a Little Brown Bird from behind the "duck blind"

Wednesday, September 2, 2020

Amaryllis Care

It's no secret that I love Amaryllis blossoms (Hippeastrum spp.) If in doubt, see Forcing Bulbs: AmaryllisFavorite Christmas Plants, and Forcing Amaryllis Bulbs. Once they bloom, I let the bulbs go dormant, and then replant them in large communal pots. With some care, the bulbs flower in subsequent years, although the blooms are typically smaller and not as bodacious as the initial bloom. It is still satisfying.

Amaryllis bulbs of various ages (mature and pups)

I noticed that my pots of Amaryllis were starting to look a little bedraggled, and a few plants were dusted with white powder, indicating some kind of pest. Time for some clean up and TLC!

Soaking the roots in a little water

I dug up the bulbs and inspected the roots. They looked long, strong, and healthy, despite what was happening above ground. I trimmed the shoots, cut the roots back to about 4 inches long, and then let the roots soak in a pail of clean water to mitigate the shock. This gave me time to scrub the pots inside and out.

Fresh soil in the clean pots

Next, I replanted the bulbs in fresh potting soil, being careful not to damage the roots, and then topped-dressed with fresh moss. Finally, I watered them in carefully, to make sure the bulbs did not get flooded with water. After several weeks, the bulbs have started putting out leaves.

Freshly planted and top-dressed with moss

We'll see if the special care encourages another round of blossoms. In the meantime, I'm content to watch the fresh foliage grow.